Categories
Hardware Unix

Recovery LVM Data from RAID

We had a client that had an OLD fileserver box, a Thecus N4100PRO. It was completely dust-ridden and the power supply had burned out.

Since these drives were in a RAID configuration, you could not hook any one of them up to a windows box, or a linux box to see the data. You have to hook them all up to a box and reassemble the RAID.

We took out the drives (3 of them) and then used an external SATA to USB box to connect them to a Linux server running CentOS. You can use parted to see what drives are now being seen by your linux system:

parted -l | grep ‘raid\|sd’

Then using that output, we assembled the drives into a software array:

mdadm -A /dev/md0 /dev/sdb2 /dev/sdc2 /dev/sdd2

If we tried to only use two of those drives, it would give an error, since these were all in a linear RAID in the Thecus box.

If the last command went well, you can see the built array like so:

root% cat /proc/mdstat
Personalities : [linear]
md0 : active linear sdd2[0] sdb2[2] sdc2[1]
1459012480 blocks super 1.0 128k rounding

Note the personality shows the RAID type, in our case it was linear, which is probably the worst RAID since if any one drive fails, your data is lost. So good thing these drives outlasted the power supply! Now we find the physical volume:

pvdisplay /dev/md0

Gives us:

— Physical volume —
PV Name /dev/md0
VG Name vg0
PV Size 1.36 TB / not usable 704.00 KB
Allocatable yes
PE Size (KByte) 2048
Total PE 712408
Free PE 236760
Allocated PE 475648
PV UUID iqwRGX-zJ23-LX7q-hIZR-hO2y-oyZE-tD38A3

Then we find the logical volume:

lvdisplay /dev/vg0

Gives us:

— Logical volume —
LV Name /dev/vg0/syslv
VG Name vg0
LV UUID UtrwkM-z0lw-6fb3-TlW4-IpkT-YcdN-NY1orZ
LV Write Access read/write
LV Status NOT available
LV Size 1.00 GB
Current LE 512
Segments 1
Allocation inherit
Read ahead sectors 16384

— Logical volume —
LV Name /dev/vg0/lv0
VG Name vg0
LV UUID 0qsIdY-i2cA-SAHs-O1qt-FFSr-VuWO-xuh41q
LV Write Access read/write
LV Status NOT available
LV Size 928.00 GB
Current LE 475136
Segments 1
Allocation inherit
Read ahead sectors 16384

We want to focus on the lv0 volume. You cannot mount yet, until you are able to lvscan them.

lvscan

Show us things are inactive currently:

inactive ‘/dev/vg0/syslv’ [1.00 GB] inherit
inactive ‘/dev/vg0/lv0’ [928.00 GB] inherit

So we set them active with:

vgchange vg0 -a y

And doing lvscan again shows:

ACTIVE ‘/dev/vg0/syslv’ [1.00 GB] inherit
ACTIVE ‘/dev/vg0/lv0’ [928.00 GB] inherit

Now we can mount with:

mount /dev/vg0/lv0 /mnt

And viola! We have our data up and accessable in /mnt to recover! Of course your setup is most likely going to look different from what I have shown you above, but hopefully this gives some helpful information for you to recover your own data.

Categories
Hardware Photos Unix

Getting Motion working with Vivotek IP Camera

I finally got around to looking into rigging up some security cameras around my home so I can find out what damn neighbors have been letting their dogs do their business in front of my gate! I actually caught one woman and her dog and when I pointed out nicely that there was a tree only 20 feet down the sidewalk, she said her dog wants to urinate where it wants, so she lets it because it pulls the leash. Yeah, well, that’s why you are the HUMAN and the master to the animal. Ah, don’t get me started, that is a whole other blog post.

Anyway, where were we? Oh, right! IP cameras! I decided upon the Vivotek IB8369 since, well, it’s awesome. Works at night, great resolution, nice range, can be outdoors, uses POE, and a bunch of other stuff, check the website, what am I, a sales guy?

OK, next step, I wanted to rig this up using my Linux box, not Windows. So I decided to use Motion to capture AVI video when there is motion detected. It will do so, AND store individual JPG frames so you can pick one that is a nice shot and then post it all around your neighborhood with a caption that says “BAD DOG OWNER”. Your needs may differ.

Getting Motion working was a bit of a hassle, here are a few things I did that could help you if you are trying to set this up also.

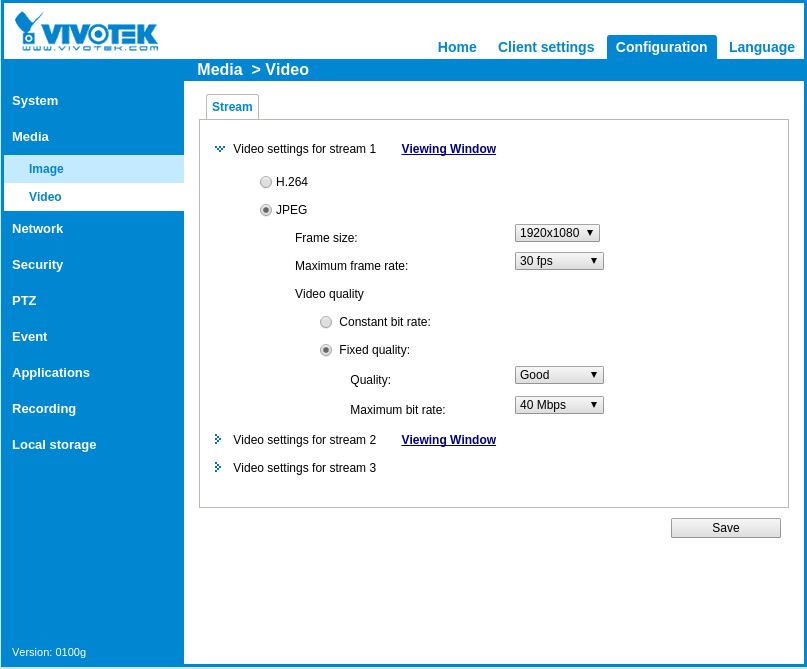
First, the camera itself, you should set a static IP on it using it’s web interface, and then I had to go into Configuration->Media->Video and set stream 1 to use JPEG. You will also need to set the “Frame size” to something where the width/height are divisible by 16, otherwise you will see messages like below from the Motion logs:

[1] [CRT] [NET] [Aug 27 18:45:01] netcam_start: netcam image height (1080) is not modulo 16

And here is a screenshot of the webcam settings page:

The next thing is to make sure your /etc/motion.conf has good settings. If you haven’t, you could see messages in the log like:

[1] [NTC] [STR] [Aug 27 18:49:06] http_bindsock: motion-stream testing : IPV4 addr: 127.0.0.1 port: 8081
[1] [CRT] [STR] [Aug 27 18:49:06] http_bindsock: motion-stream bind() failed, retrying:
[1] [ERR] [STR] [Aug 27 18:49:06] http_bindsock: motion-stream socket failed, retrying:
[1] [CRT] [STR] [Aug 27 18:49:06] http_bindsock: motion-stream creating socket/bind ERROR:
[1] [ERR] [ALL] [Aug 27 18:49:06] motion_init: Problem enabling motion-stream server in port 8081:

Most are okay from the defaults, here are the ones I changed to make things work:

netcam_url http://192.168.2.10/video.mjpg
netcam_keepalive on
target_dir /var/motion
stream_motion on
stream_localhost off
webcontrol_localhost off

And then finally the commands to run Motion:

chown motion /var/motion/
service motion start
tail -f /var/log/motion.log

The error log is your friend, and once you have things working nicely, change the log level in the conf file to something more reasonable.


Categories
Hardware Unix

Fedora21 and Video Configuration

Another Fedora upgrade, another few hours spent mucking about with xorg.conf and video settings!

So I have two workstations I was upgrading, one I chose to stick with nouveau and the other I used nvidia drivers.

The nouveau one, I had an older card, the GeForce GTX 275, and the nvidia drivers I downloaded did not work well, so it was easier to stick with nouveau. You can use lspci to see your card info:

/sbin/lspci | grep VGA

Fedora found my card and monitors, but one of them did not get the proper resolution. After a number of failed attempts at configuring xorg.conf, I ended up just using the following in my .xinitrc:

/bin/xrandr –addmode DVI-I-2 1920×1080
/bin/xrandr –output DVI-I-2 –mode 1920×1080

and that worked. You could also put that in a file like “/etc/X11/xinit/xinitrc.d/99-xrandr” like this, and make sure you “chmod a+x” on the file:

#!/bin/sh
/bin/xrandr –addmode DVI-I-2 1920×1080
/bin/xrandr –output DVI-I-2 –mode 1920×1080

For the nvidia install, I had to do the following steps

  • Download the driver from http://www.geforce.com/drivers
  • Drop out of the GUI with “init 3” as root
  • Run the driver file, i.e. “sh ./NVIDIA-Linux-x86_64-340.76.run”
  • When you run the file, it will ask if you want to blacklist the nouveau stuff, and the answer is yes! It will create “/etc/modprobe.d/nvidia-installer-disable-nouveau.conf” with the following:

# generated by nvidia-installer
blacklist nouveau
options nouveau modeset=0

Then you need to edit your grub file “/boot/grub2/grub.cfg” and find your recent vmlinuz line and add this to the end of it:

rdblacklist=nouveau

Then you can reboot. You’ll need to muck with the xorg.conf, you can see my version here.

Another thing to note, you should make note of your IP address, if you wreck your video output and can’t get the GUI to show anymore, you can still SSH into the machine and change things and reboot. I got into a case where my box had DHCP so I didn’t know the IP anymore, and I did the following to get in and fix my xorg.conf:

  • Boot up the live CD
  • You want to mount your drive now, but first you need to find it via “pvs”
  • Pvs will show you the name to use for “lvdisplay fedora” as an example, you may need to change “fedora” to your drive name
  • Lvdisplay will show you the LVM partitions, you want to mount the root partition to get into /etc/X11, I had to do “mount /dev/fedora/lv_root /mnt”

Once mounted, you can tweak the grub or the xorg.conf, whichever caused you to lose the video settings!

Hope this helps someone!

Categories
Hardware

Cisco850 router can’t handle the speed

I just got a Comcast upgrade to my home router for new speeds and here is what I found out! My old speed measured was 30 Mbps down, 11 Mbps up.

The guy installed the new Comcast box and then I tried again and same speeds! This was from my PC which went through two hubs, and a cisco850 router before getting to the Comcast box.

I then plugged a laptop right into one of the Comcast ethernet ports and got 120 and 11, which is sweet! Well, the 120 is sweet.

Then I plugged the laptop into the cisco850 and I was back to the 30Mbps again. The cisco is rated for 10/100 so I thought it would go up higher, but no such luck. So now I need to get a new router for my home network and see how that performs!

More later.

Categories
Hardware Movies Unix

Ubuntu and XBMC

Xbox Media Center be praised!

I just installed this on a linux Ubuntu box, and I used the “Live” version which I put onto a USB drive. So, the steps:

  1. Download the ISO file from http://xbmc.org/download/
  2. Burn the ISO onto a thumb drive (or CD)
  3. Boot your host off the USB/CD, you may need to hit F11 during bootup to get to your BIOS and choose boot media.
  4. When booting you can either install or boot off the media to see how it works on your setup. Once you verify your setup, you should install.
  5. Hook up to your TV and stereo and go!

Now, I actually have a file server in my home that stores all my movies in AVI format. So, my XBMC is a very shrunk down system, you could even put it on a small solid state flash drive which would be nice and fast. Then the question is, how to access the files from another server?

I use NFS on my server and mount them on the XBMC host. However, I had to do a few steps to get this going:

  1. You need to install nfs-common to be able to mount. But, the Live install does not have that by default. So, you need to SSH into your XBMC. This is a little tricky, since XBMC will use DHCP to get an IP address and you may not know what IP it has!
  2. Find the IP. One way is to use a “pinger” program that will try and ping every IP in your home network range, and once you do that you can try SSH’ing into each IP that turns up. I use PUTTY if on a windows box to do SSH.
  3. Once logged in, then do “sudo apt-get update”
  4. Then do “sudo apt-get install nfs-common”
  5. Edit your fstab file, i.e. “sudo vi /etc/fstab”
  6. You’ll want to add your file server, usually something like “192.168.2.100:/movies                /movies         nfs     defaults        0       0”
  7. Make sure you mkdir your mount point (/movies in this example) on the xbmc host, then do “sudo mount -a” and your xbmc host should mount the movies
  8. In XBMC, go to Video and add “root file system” to point to your new mount point!
  9. Enjoy!


Categories
Hardware

Cisco851 Router Working With Comcast

I got a Comcast connection the other day so now my house is dual-homed to the Internet! I have DSL with 5 static IPs (which is why I am keeping it), and now a lickity quick Comcast connection.

I did have problems getting the NATing properly working on the Cisco851 however. The first attempt had the Cisco getting the Comcast IP assigned properly w/ DHCP, and the router could ping out just fine. But, no computers behind it using NAT could get out. After much trial-and-error and dozens of google results, I got the following config that worked. I haven’t fully cleaned it up yet and fleshed out the access lists completely, but the important stuff is there 🙂

Another point to add, is that I had heard things about the MAC address getting tied to the first computer you plug in. When I was troubleshooting, I called Comcast and talked to a tech about this, and it is NOT a worry when you are plugging a router in. They claim they only use the MAC with Comcast equipment. I will say that I had first plugged a laptop in to test the line, and then I switched to the cisco without reseting the box, so my experience seemed to prove the tech’s statement.

Click here for the cisco config

Categories
Hardware Unix

Fedora13 kernel update breaks video

I did my usual old “yum update” the other day and it hosed up my video upon reboot!

Never fear, it is a known problem, and has probably already been fixed by the time you read this.

But one thing I learned is that you should have akmod installed so the system will be smart and use a previous video driver if it fails. To do this, all I needed to do was:

yum install akmod-nvidia

then, on reboot, it was all working again.

[Update]

One thing to note is that when you do a yum update, make sure if there is a new kernel that there is a corresponding nvidia update for it! If not, then DO NOT yum update, and try again in a day or so. Eventually there will be a matching nvidia update and you are safe to update. Example:

Installing:

kernel x86_64 2.6.34.9-69.fc13 updates 22 M

kernel-devel x86_64 2.6.34.9-69.fc13 updates 6.4 M

Removing:

kernel x86_64 2.6.34.7-63.fc13 @updates 102 M

kernel-devel x86_64 2.6.34.7-63.fc13 @updates 23 M

Installing for dependencies:

kmod-nvidia-2.6.34.9-69.fc13.x86_64 x86_64 1:260.19.36-1.fc13.3 rpmfusion-nonfree-updates 2.8 M

Removing for dependencies:

kmod-nvidia-2.6.34.7-63.fc13.x86_64 x86_64 1:260.19.29-1.fc13 @rpmfusion-nonfree-updates 12 M

Categories
Hardware Unix

Fedora 13 and Nvidia

Now that I got my new system running Fedora 13, I needed to configure my Nvidia card to support my two monitors.

It was pretty straightforward, and I found a post that does an excellent job of summarizing it at http://fedorasolved.org/video-solutions/nvidia-yum-kmod

I will comment on one thing though – when I did the install, I used the basic kernel for my i686 32-bit CPU. I found that my 4 GB of RAM only showed up in the system information page as 2.7 GB! I looked into this a bit, and it turns out that if you want greater than 3GB of memory supported, you need to have a 64-bit machine, OR you can handle this in software with the PAE kernel.

PAE stands for “Physical Address Extension” and all you have to do in install the PAE kernel, and then also the PAE Nvidia modules, and everything will work fine!

I know have my machine up with 8GB of RAM and working perfect! I read that the PAE kernel will cause a performance hit (sort of like doing RAID via software versus hardware I suppose), but I don’t see anything like that on my system.

Categories
Hardware Unix

Installing Fedora 13

I was readying my nice new home Linux server/desktop for Fedora 12 when I realized I only had to wait a few more days for Fedora 13. Sounded good!

My new server has a nice Coolermaster case that can hold 10 drives, and has a 1100 Watt power supply. I really like the case, it makes putting in drives a snap, plus the cable wiring went very well. Plus the thing is made of cool brushed aluminum. Who can argue with that?

I was re-commissioning this server after having used it as a gaming Windows machine for a bit. So it had dual NVidia SLI cards (GeForce 8800 Ultra) in it. When I first booted up the LiveCD, it got kernel errors that didn’t really track down to anything that was helpful. It would boot up but then freeze after a few minutes.

I tried the DVD install, and that got the same results. After much head scratching and googling, I tried removing one of the Nvidia cards. I was planning on only using 2 monitors anyway, and each card had 2 DVI outputs. This did the trick!

Next up, I had to run keyboard/mouse cables to my home office. I like to keep the actual computer down in my server room in the basement, it keeps my office nice and quiet. But I found that my 100 foot run for my PS/2 mouse didn’t work! My mouse is a Logitech MX310 that is really USB but I use a PS/2 converter on it so I can use a long cable run. This had been working fine on my previous Linux installations.

I found that the mouse would work fine if directly attached, so it was a distance issue! Which is odd, since on my old server it worked fine, and the cable was the same. I ended up using an USB extender device that I had bought years ago and never needed. It uses ethernet cable in between two adapters so you can have a long USB run. This did the trick! The brand is “coolgear” and I forget where I got it.

Next up: Getting Nvidia working on Fedora 13

Categories
Fun Stuff Hardware

Bad Marketing from Cisco

I was in Best Buy the other day browsing some wi-fi access points and came across the WRT54G2 which seemed to suit my purposes. On the back of the box I encountered this interesting piece of marketing material:

wrt54g2

Now seriously, what the hell? They’re using a fading scale to indicate the uses? So I suppose “Multiple Computers” is vaguely recommended? And “Streaming Music” seems to be slightly recommended? I suppose the usage icon on the far right is downright not recommended, but can’t we just get an honest do or don’t from the usage guide?

And then the marketing team seems to have their own rating system which is not explained anywhere and is completely unhelpful. Ok, so “High Performance” is rated N++! Are you kidding me? What the hell is a “N”, and what does a plus sign indicate? What would “N–” mean?

The back of the box should be a case study in a marketing class on what not to do!

A quick tech tip… there are actually TWO WRT54G2 models floating around on shelves. DO NOT buy the one that has this silly thing on the back of the box, it actually has less onboard memory than the other model. But they both cost the same.