Using bootstrap to display button pulldowns, http://getbootstrap.com/components/#btn-dropdowns, I had trouble getting the text to wrap and make the button taller as needed. The fix was adding this to the CSS for the button!
white-space: normal;
Using bootstrap to display button pulldowns, http://getbootstrap.com/components/#btn-dropdowns, I had trouble getting the text to wrap and make the button taller as needed. The fix was adding this to the CSS for the button!
white-space: normal;
I had a client who was losing network connectivity intermittently recently and it turns out they needed to increase the high limit for network connections. Centos7 has some variable name changes from previous versions so here are some helpful tips on how to increase the limits.
In older Centos you might have seen these error messages:
ip_conntrack version 2.4 (8192 buckets, 65536 max) – 304 bytes per conntrack
In newer verions, something like:
localhost kernel: nf_conntrack: table full, dropping packet
The below is for Centos versions that have renamed the ip_conntrack to nf_conntrack.
To get a list of network parameters:
sysctl -a | grep netfilter
This shows current value for the key parameter:
/sbin/sysctl net.netfilter.nf_conntrack_max
This shows your system current load:
/sbin/sysctl net.netfilter.nf_conntrack_count
So now to update the value in the kernel to triple the limit, of course make sure your RAM has room with what you choose:
/sbin/sysctl -w net.netfilter.nf_conntrack_max=196608
To make it permanent after reboot, please add these values to the /etc/sysctl.conf
net.ipv4.netfilter.ip_conntrack_max=196608
Hope this helps!
My first big problem was I was going to rip a Christmas CD and my new Windows 10 upgrade no longer saw my DCD/CD Asus player! It worked fine in Windows 7, but it would not even show up in the device manager (hint: windows-key + “R”, then type “control” and choose hardware -> device manager)
I tried a bunch of things before discovering I had to create a registry subkey! Follow these steps:
Press the Windows logo key + R to open the Run box. (or right-click on windows icon in lower left corner)
Now let me say to Microsoft, what the hell? One of the better things about the recent versions of Windows has been that it autodetects and installs drivers VERY well, and the fact that this happened to me (and frankly a LOT of others based on the dozens of online posts I had to wade through) really shows a lack of QA and continued driver support I would expect from MSFT.
I sure do like me a nice background theme! Whenever you start to realize that holy Hell I’ve been sitting in front of a computer for hours and why am I not outside enjoying the wonderful San Francisco weather — that is when you need to tune into a nice background theme and trick your mind into thinking you are on the beach or up in the mountains or playing Angry Birds?! Who the hell thought that was a good theme to make?
In any case, go check out the panoramic themes especially made for multiple monitors. Download and pick your favorite!
Then, make sure you go to control panel -> appearance -> personalization (you should be here already if you just downloaded and installed a theme), then click “Desktop Background” at the bottom and at the bottom of that settings page, make sure “Choose a fit” is set to “Span”. Note that you will need to do that for each theme since it doesn’t apply to all at once.
Enjoy!
My opinion is that Google made a huge mistake with the new name “Alphabet” — they should fire the marketing people behind that concept, who no doubt must have had a bad experience mixing Redbull, Ecstasy, and AlphaBits. I mean, hey, I get it, when in Vegas — but wait until after you sober up before renaming the company.
Anywho, the thing that really gets me upset is now there is some new horrible favicon that google uses and it looks out of place on my chrome browser tabs now. This new google icon is distracting, too busy, and insults any reasonable sense of aesthetic. So, here is how to change it back!
Download the Favicon Changer chrome extension (I use chrome, but I think there are versions for other browsers if you look around). Visit google.com, and when you use the extension you’ll have to give it a URL to your chosen favicon, I have a sample on at http://dougco.com/678934759.png — if you don’t want to see a broken https link for https sites, you’ll need to give a SSL URL, like https://dougco.com/678934759.png
There, now your browser tabs are more serene.
I finally got around to looking into rigging up some security cameras around my home so I can find out what damn neighbors have been letting their dogs do their business in front of my gate! I actually caught one woman and her dog and when I pointed out nicely that there was a tree only 20 feet down the sidewalk, she said her dog wants to urinate where it wants, so she lets it because it pulls the leash. Yeah, well, that’s why you are the HUMAN and the master to the animal. Ah, don’t get me started, that is a whole other blog post.
Anyway, where were we? Oh, right! IP cameras! I decided upon the Vivotek IB8369 since, well, it’s awesome. Works at night, great resolution, nice range, can be outdoors, uses POE, and a bunch of other stuff, check the website, what am I, a sales guy?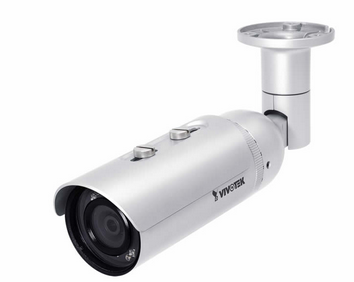
OK, next step, I wanted to rig this up using my Linux box, not Windows. So I decided to use Motion to capture AVI video when there is motion detected. It will do so, AND store individual JPG frames so you can pick one that is a nice shot and then post it all around your neighborhood with a caption that says “BAD DOG OWNER”. Your needs may differ.
Getting Motion working was a bit of a hassle, here are a few things I did that could help you if you are trying to set this up also.
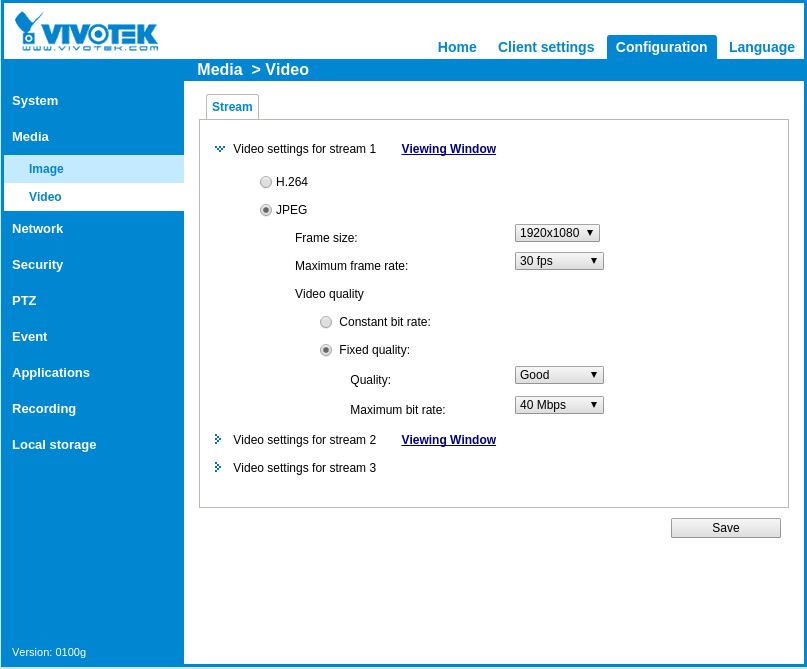
First, the camera itself, you should set a static IP on it using it’s web interface, and then I had to go into Configuration->Media->Video and set stream 1 to use JPEG. You will also need to set the “Frame size” to something where the width/height are divisible by 16, otherwise you will see messages like below from the Motion logs:
[1] [CRT] [NET] [Aug 27 18:45:01] netcam_start: netcam image height (1080) is not modulo 16
And here is a screenshot of the webcam settings page:
The next thing is to make sure your /etc/motion.conf has good settings. If you haven’t, you could see messages in the log like:
[1] [NTC] [STR] [Aug 27 18:49:06] http_bindsock: motion-stream testing : IPV4 addr: 127.0.0.1 port: 8081
[1] [CRT] [STR] [Aug 27 18:49:06] http_bindsock: motion-stream bind() failed, retrying:
[1] [ERR] [STR] [Aug 27 18:49:06] http_bindsock: motion-stream socket failed, retrying:
[1] [CRT] [STR] [Aug 27 18:49:06] http_bindsock: motion-stream creating socket/bind ERROR:
[1] [ERR] [ALL] [Aug 27 18:49:06] motion_init: Problem enabling motion-stream server in port 8081:
Most are okay from the defaults, here are the ones I changed to make things work:
netcam_url http://192.168.2.10/video.mjpg
netcam_keepalive on
target_dir /var/motion
stream_motion on
stream_localhost off
webcontrol_localhost off
And then finally the commands to run Motion:
chown motion /var/motion/
service motion start
tail -f /var/log/motion.log
The error log is your friend, and once you have things working nicely, change the log level in the conf file to something more reasonable.
Installing the recent linux version seems to come with a default setting of flooding the /var/log/messages with entirely annoying duplicitous messages like:
systemd: Created slice user-0.slice.
systemd: Starting Session 1013 of user root.
systemd: Started Session 1013 of user root.
systemd: Created slice user-0.slice.
systemd: Starting Session 1014 of user root.
systemd: Started Session 1014 of user root.
Here is how I got rid of these:
vi /etc/systemd/system.conf
And then uncomment LogLevel and make it: LogLevel=notice
Then:
systemctl restart rsyslog
systemd-analyze set-log-level notice
Argh! That damn reminder for windows 10 is on my task bar and won’t go away!
![]() Fear no longer, here’s what to do. Control Panel -> (do a search for ‘updates’) -> View installed updates
Fear no longer, here’s what to do. Control Panel -> (do a search for ‘updates’) -> View installed updates
Then look around for “KB3035583” and “KB2952664” and uninstall them. Those are two that I have confirmed, I also have heard “KB3123862” should also be removed.
To make sure they don’t get re-installed automatically, you should change your settings (again, control panel, search for “turn automatic updating on or off”) so that windows downloads updates, but let’s you decide whether to install them. Then, when you see those two KB updates in the list, you can right-click them and choose “hide update”.
Another option entirely is to actually go ahead and agree to the windows 10 preview! Ha! You can’t tell by reading this, but I am laughing a lot right now.
![]() Another Fedora upgrade, another few hours spent mucking about with xorg.conf and video settings!
Another Fedora upgrade, another few hours spent mucking about with xorg.conf and video settings!
So I have two workstations I was upgrading, one I chose to stick with nouveau and the other I used nvidia drivers.
The nouveau one, I had an older card, the GeForce GTX 275, and the nvidia drivers I downloaded did not work well, so it was easier to stick with nouveau. You can use lspci to see your card info:
/sbin/lspci | grep VGA
Fedora found my card and monitors, but one of them did not get the proper resolution. After a number of failed attempts at configuring xorg.conf, I ended up just using the following in my .xinitrc:
/bin/xrandr –addmode DVI-I-2 1920×1080
/bin/xrandr –output DVI-I-2 –mode 1920×1080
and that worked. You could also put that in a file like “/etc/X11/xinit/xinitrc.d/99-xrandr” like this, and make sure you “chmod a+x” on the file:
#!/bin/sh
/bin/xrandr –addmode DVI-I-2 1920×1080
/bin/xrandr –output DVI-I-2 –mode 1920×1080
For the nvidia install, I had to do the following steps
# generated by nvidia-installer
blacklist nouveau
options nouveau modeset=0
Then you need to edit your grub file “/boot/grub2/grub.cfg” and find your recent vmlinuz line and add this to the end of it:
rdblacklist=nouveau
Then you can reboot. You’ll need to muck with the xorg.conf, you can see my version here.
Another thing to note, you should make note of your IP address, if you wreck your video output and can’t get the GUI to show anymore, you can still SSH into the machine and change things and reboot. I got into a case where my box had DHCP so I didn’t know the IP anymore, and I did the following to get in and fix my xorg.conf:
Once mounted, you can tweak the grub or the xorg.conf, whichever caused you to lose the video settings!
Hope this helps someone!
 MDB tools sure do come in handy when you have to handle someone’s old nasty microsoft access files!
On older Centos, I could just yum add mdbtools, but on Centos 7 I found the following was required.
First, you need to make sure you add these packages (you may need others in addition but these were the ones I had to add):
yum -y install glib2-devel
yum -y install autoconf
yum -y install automake
yum -y install txt2man
yum -y install gnome-doc-utils
yum -y install libtool
yum -y install unixODBC unixODBC-devel
yum -y install flex flex-devel bison bison-devel
Why did I split all that into 8 lines when I guess we could have just stuck them all in one? Why did I put flex and bison in one line, but not others? Who knows! Just roll with it.
Then you need to grab the source and compile:
mkdir tmp1; cd tmp1
git clone https://github.com/brianb/mdbtools.git mdbtools
cd mdbtools
autoreconf -i -f
./configure –with-unixodbc=/usr
make
make install